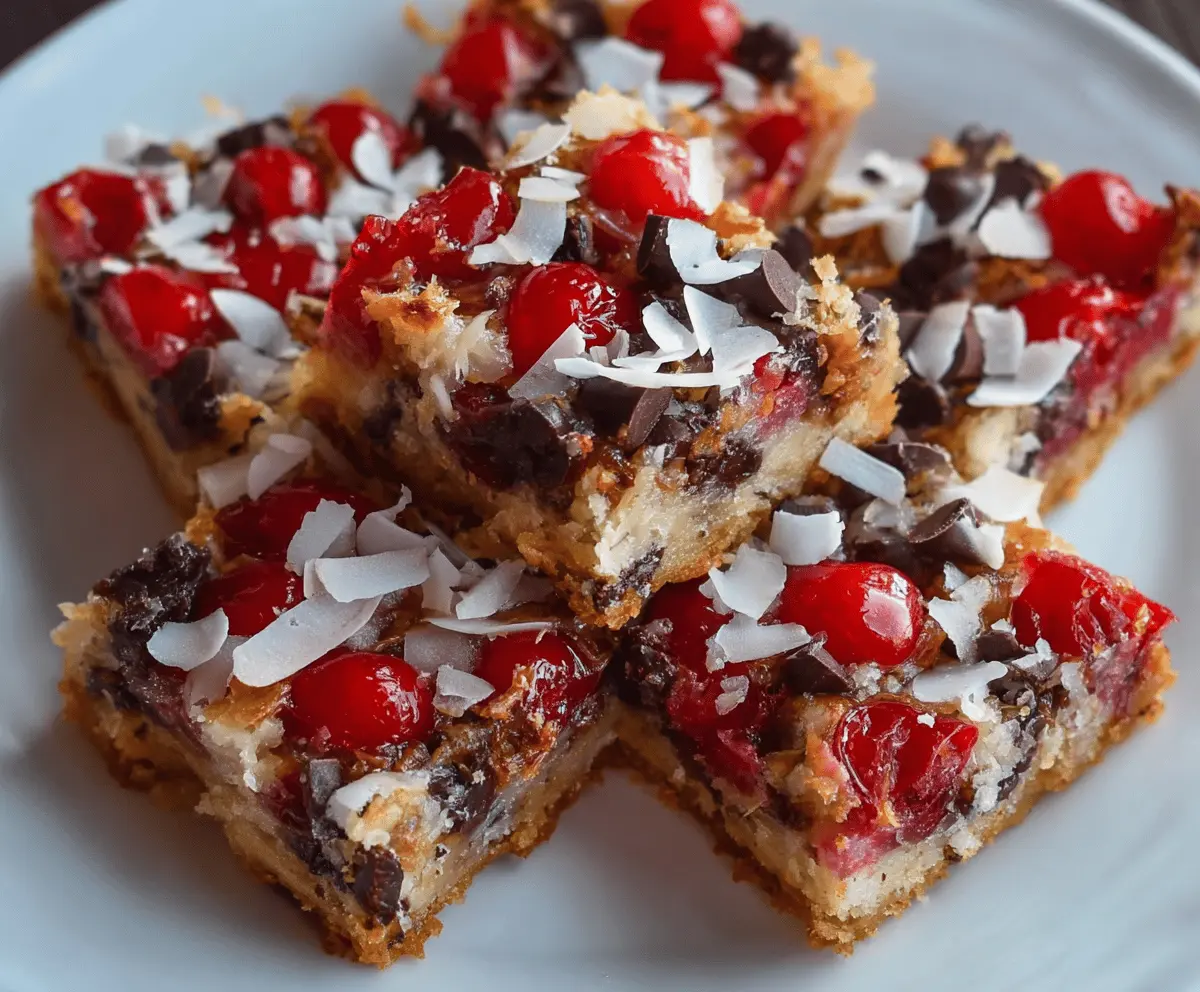
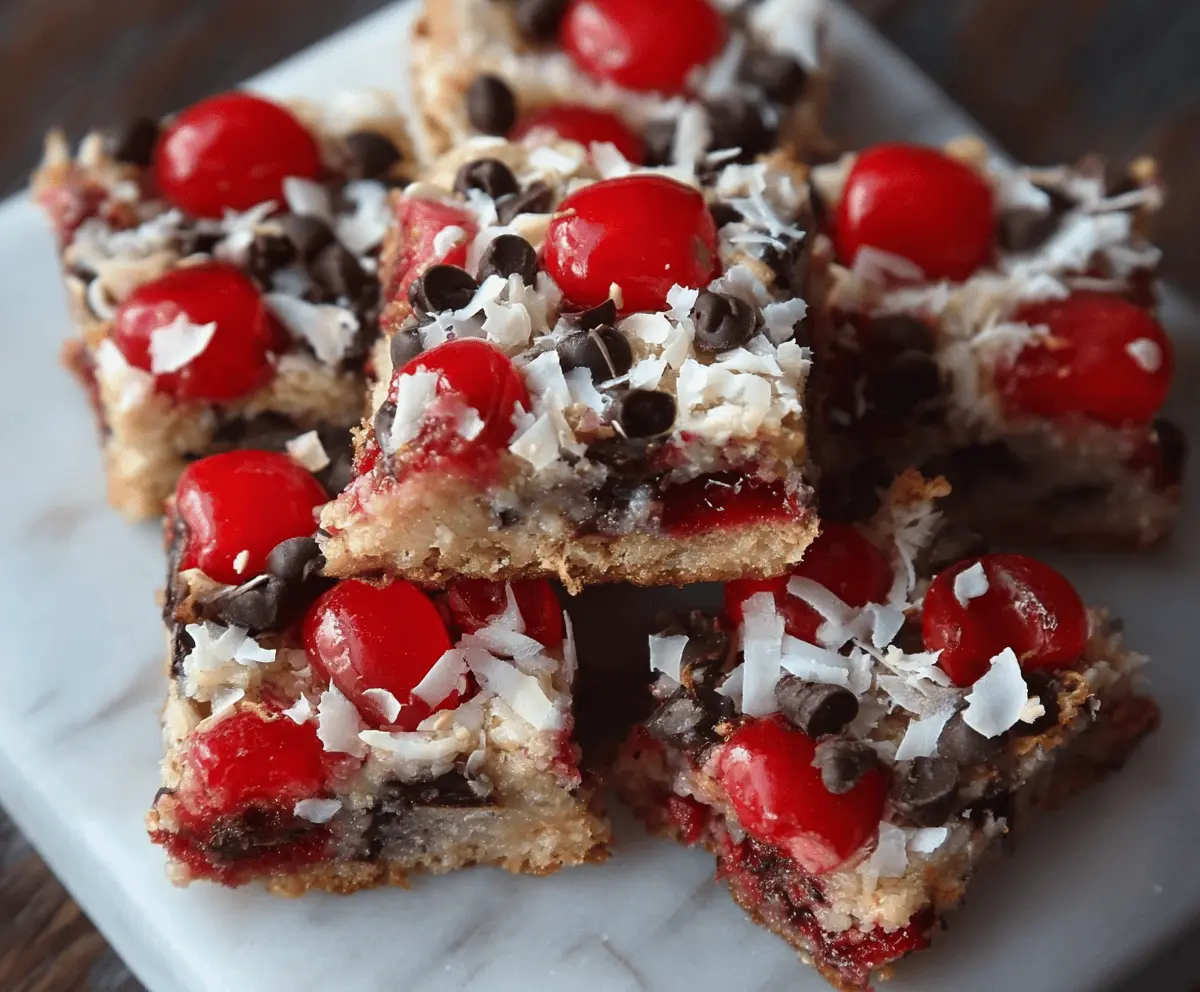
Cherry Magic Cookie Bars are a sweet treat that’s super easy to make! With a layer of graham cracker crust, chocolate chips, and yummy cherries, these bars are a delicious mix of flavors.
These bars are great for sharing or enjoying on your own (no judgment here!). When I make them, they never last long—everyone loves that cherry goodness! 😊
Key Ingredients & Substitutions
Graham Cracker Crumbs: These crumbs make the base of your bars. If you don’t have graham crackers, you can use digestive biscuits or even vanilla wafers for a different flavor!
Unsalted Butter: I love using unsalted butter so that I can control the salt level. If you’re looking for a dairy-free option, melted coconut oil or vegan butter works well, too.
Sweetened Shredded Coconut: Coconut adds both flavor and texture. If you’re not a coconut fan, just leave it out or substitute with crushed nuts like pecans or walnuts!
Semisweet Chocolate Chips: For a richer taste, consider dark chocolate chips. If you need a dairy-free version, look for vegan chocolate chips.
Maraschino Cherries: These cherries add a sweet and tart flavor. If they’re not available, you could use fresh cherries (pitted) or even dried cranberries for a twist.
Sweetened Condensed Milk: This keeps the bars moist and adds sweetness. You can make your own dairy-free version using coconut milk or almond milk, cooked with sugar!
How Can I Ensure My Cookie Bars Are Perfectly Layered?
Layering is key for the magic in these cookie bars! Make sure each layer is evenly spread to get a fantastic texture.
- Press the graham cracker mixture firmly into the bottom—this forms the solid base and helps hold everything together.
- Sprinkle ingredients evenly; start with coconut, then chocolate chips, finishing with the cherries on top. This distribution helps with flavor in every bite!
- Pour the sweetened condensed milk slowly and evenly across the top, covering everything so that the layers meld beautifully during baking.
By following these layering tips, you’ll ensure each bar has the right mix of crunch and gooey goodness with every bite! Enjoy! 😊
Cherry Magic Cookie Bars
Ingredients You’ll Need:
For the Base:
- 1 1/2 cups graham cracker crumbs (about 12 full sheets)
- 1/2 cup unsalted butter, melted
For the Layers:
- 1 cup sweetened shredded coconut
- 1 cup semisweet chocolate chips
- 1 cup maraschino cherries, halved and drained
For the Binding:
- 1 (14 oz) can sweetened condensed milk
How Much Time Will You Need?
This delightful recipe takes about 15 minutes of prep time and 25 to 30 minutes of baking. After baking, it’s best to let the bars cool for about 1 hour in the fridge to make slicing easier. In total, you’re looking at about 1 hour and 45 minutes, including cooling.
Step-by-Step Instructions:
1. Preheat the Oven & Prepare the Pan:
Start by preheating your oven to 350°F (175°C). Then, take a 9×9-inch baking pan and lightly grease it with some butter or cooking spray. You can also line it with parchment paper for easier removal later.
2. Make the Crust:
In a medium bowl, combine the graham cracker crumbs with the melted butter. Use a fork or spatula to mix them together until the crumbs are uniformly moistened. Once mixed, press this crumb mixture firmly into the bottom of your prepared pan to form an even crust.
3. Add the Layers:
Now for the fun part! Sprinkle the shredded coconut evenly over the crust, letting it cover all areas. Next, add the semisweet chocolate chips, followed by the maraschino cherry halves, scattering them evenly across the chips.
4. Pour the Sweetened Condensed Milk:
Take your can of sweetened condensed milk and slowly pour it over the entire mixture in the pan. Make sure it covers everything, as this will help bind the bars together.
5. Bake and Cool:
Place the pan in the preheated oven and bake for 25 to 30 minutes. Keep an eye on it until the edges turn a lovely golden brown and the center looks set. When ready, remove it from the oven and let it cool completely in the pan on a wire rack.
6. Chill and Slice:
Once your bars are cool, pop them in the refrigerator for at least 1 hour. This chilling step is important as it helps firm up the bars for easier slicing. After they’ve chilled, use a sharp knife to cut them into squares.
7. Serve and Enjoy:
Your Cherry Magic Cookie Bars are ready to be served! Enjoy them as a sweet snack or dessert. Store any leftovers in an airtight container in the fridge to keep them fresh.
Delight in the rich, chewy goodness of your homemade Cherry Magic Cookie Bars—each bite is a wonderful combination of flavors! 🍒🍫
Can I Use Different Types of Cherries?
Absolutely! If you prefer fresh cherries, just make sure to pit and halve them before adding. For a unique twist, you can also use dried cherries or cranberries, though this will change the flavor profile slightly.
Can I Make These Bars Gluten-Free?
Yes! To make them gluten-free, simply use gluten-free graham crackers or another gluten-free cookie option for the crust. Ensure all other ingredients, like chocolate chips and coconut, are gluten-free as well.
How Should I Store Leftovers?
Store any leftover bars in an airtight container in the refrigerator. They’ll stay fresh for up to a week! You can enjoy them cold straight from the fridge or let them sit at room temperature for a few minutes before serving for a softer texture.
Can I Freeze These Bars?
Yes, you can freeze the Cherry Magic Cookie Bars! Wrap them tightly in plastic wrap and then place them in a freezer-safe container. They can be frozen for up to 3 months. Thaw in the fridge overnight before enjoying.